

Description
Ultimate Woodturning Tool Package: “I Want It All” by Lyle Jamieson
The Complete Solution for Passionate Woodturners
Unlock your full woodturning potential with the “I Want It All” package, exclusively designed by Lyle Jamieson. This comprehensive woodturning tool kit is your one-stop solution, featuring an array of tools and accessories meticulously crafted to elevate your projects. From beginners to seasoned artisans, this package caters to all, ensuring precision, versatility, and ease of use.
CLICK HERE >> INSTALLATION INSTRUCTIONS
There is more information on the topics listed below:
- Jumbo Boring Bar
- History
- One Boring Bar with 3 Reach Cutting Capabilities
- 3/4 inch Dual Purpose Boring Bar
- Swivel Assemblies
- Backrest designed to fit any lathe
- Laser Measuring System
- Carbide Cutter Assembly
- DVD In-Depth Hollowing Techniques-The Easy Way DOWNLOAD
- DVD Bowl Basics DOWNLOAD
Jumbo Boring Bar
The Jamieson Jumbo Boring Bar, with a 1 1/8 inch diameter, requires the bent swivel holder for optimal use. Its tenon is reduced to ¾ inch, ensuring compatibility with the Jamieson stabilizing handle. This bar enables deep hollowing and maintains stability when extended beyond the tool rest. It’s designed for large-scale vessels, allowing for hollowing of pieces up to 17 inches tall without any vibration issues. The bar itself measures 20 inches in length.
![]()
Revolutionizing Hollow Form Turning: The Jamieson System Woodturning Tool Kit
Woodturning has always faced ergonomic challenges, especially when inserting hollowing tools into vessels. Traditionally, turners had to bend over the lathe, a posture that strains the back and neck over time. Some even resorted to sitting on the lathe bed to manage the boring bar, complicating the quest for a flawless finish. These issues inspired Lyle to develop the Jamieson Hollow Form Turning System, transforming hollowing into a safer, more enjoyable process.
This innovative woodturning tool kit introduces a secondary backrest behind the main tool rest, streamlining the hollowing process. Now, turners can stand comfortably beside the lathe, guiding the cutter with precision and ease into the vessel. The days of struggling with tools extended far over the rest, risking injury and inaccuracies, are gone. This setup eliminates the physical and mental strain associated with hollow form turning, emphasizing enjoyment and control unparalleled by traditional methods.
The Jamieson System eradicates the twisting forces that plague bent tools, allowing for the creation of thinner, smoother forms, even in pieces with complex voids.
One Boring Bar with 3 Reach Capabilities
The ¾ inch diameter, 17 inch long dual purpose boring bar has the following options to allow access to any shape hollow form turning.

The top bar has the straight swivel assembly.
The middle bar has the bent swivel assembly.
The bottom bar has the straight swivel assembly in the opposite end of the bar with the 45 degree angled hole.
¾ Inch Dual Purpose Boring Bar
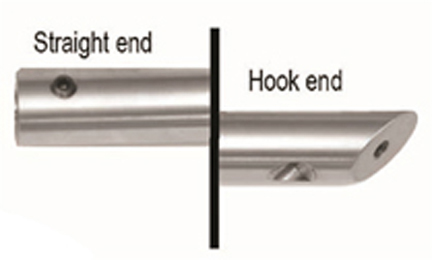 The boring bar has a dual function. It has a hole in both ends for the swivel tip cutter assembly.
This gives you a straight boring bar on one end and a bent type boring bar on the other end. Just flip the bar end to end.
Swivel Assemblies

Above are the two swivel assemblies, one straight and one bent. The bent assembly is often used in the standard 3/4 inch boring bar. The bent swivel allows greater access inside the shoulder area of a hollow form. The bent swivel is capable of reaching inside of most traditional bulbous shapes through small openings.
“D” Stabilizing Handle
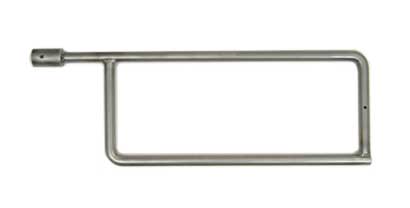
Lyle Jamieson’s innovative approach to woodturning combines ergonomic design with efficiency, transforming the traditional challenges of hollow form turning into a comfortable and enjoyable process. By introducing the “D” shaped handle and a supportive backrest, Lyle’s system significantly reduces the physical strain associated with woodturning, allowing for precise control and ease of use.
Key features include:
- Ergonomic Design: The “D” shaped handle disperses twisting forces, preventing strain and fatigue.
- Precision and Control: Allows for accurate undercutting and access to tight spots with minimal effort.
- Stress Reduction: The backrest and handle setup eliminates the need for uncomfortable positions, reducing stress on the back and neck.
- Enhanced Enjoyment: Designed for ease and fun, the system ensures woodturning is a pleasure, not a chore.
This approach not only addresses the ergonomic challenges of woodturning but also enhances the overall crafting experience, making it more accessible and enjoyable for turners of all levels.
Backrest Woodturning Tool
 The backrest supports and stabilizes the handle. This backrest allows hollow form turning with no torquing or twisting forces that exist with handheld boring bars. There is a backrest model designed to fit any lathe from minis to full size lathes, long or short beds.
Laser Measuring System

In an article for American Woodturner magazine, Lyle explored the dynamic world of laser technology in woodturning. Here’s a simplified take on “Red Hot” Laser Measuring— a method that’s accurate, quick, and surprisingly enjoyable.
- Versatile Applications: Lasers aren’t just for measuring wall thickness in hollow forms. They’re invaluable woodturning tool for tasks like assessing the bottom of bowls during coring or revealing the shape and depth of any turned form’s interior, even around waste block areas.
- Breaking Boundaries: Traditional measuring systems have their uses, but they often come with limitations that can stifle creativity. My goal with developing a new laser system was to push beyond these boundaries, offering a woodturning tool that’s as limitless as your imagination.
- Universal Measurement: Whether it’s a delicate Christmas ornament or a massive vessel, this laser system adapts to any project. It measures any wood at any thickness without hindering your tool’s access to those challenging spots.
This laser system is designed to enhance your woodturning experience, opening up new possibilities without the constraints of older methods.

The concept behind using a laser in woodturning is straightforward and effective. Here’s how it works:
- Setting Up: Position the laser so its beam just grazes past the cutting tip at your desired wall thickness. This gap determines the thickness of your hollow form’s wall.
- In Action: As you hollow out the form, the laser beam on the vessel’s surface guides your cutting. If the beam moves to the side, it’s time to slow down. Once the beam leaves the piece and hits the floor, stop cutting; you’ve reached the set wall thickness.
- Fine-Tuning: After achieving the desired thickness, you can carefully clean up any tool marks without altering the wall’s thickness.
Adjusting the Laser:
- Simple Adjustments: Secure all hardware. The only piece you’ll need to adjust during the process is the laser bracket.
- Ease of Use: Future adjustments are hassle-free. Just move or pivot the laser bracket as needed for precise measurements.
This method not only simplifies achieving consistent wall thickness but also enhances safety and efficiency in your woodturning projects.

Preparing to measure with the laser system is a crucial step for accurate woodturning. Here’s a streamlined approach:
- Set the Boring Bar: Adjust the boring bar to the necessary angle for entry through the small hole, positioning the cutting tip ready for action.
- Consistent Angle Maintenance: After setting, remove the boring bar from the vessel and ensure it’s supported at the same cutting angle by both the front and back stabilizing tool rests. This consistency is key to avoid false measurements.
- Laser Positioning: With the boring bar securely in place, adjust the laser to measure directly through the wall at a 90-degree angle. This ensures accuracy, especially in deep or hollow forms where standard calipers fall short.
Achieving Accurate Measurements:
- Avoiding False Readings: Ensure measurements are perpendicular to the surface to prevent inaccuracies. Measuring at incorrect angles can lead to misleading results.
- Using Visual Aids: A plastic card with lines drawn can serve as a guide for laser adjustment. The line near the edge represents the desired wall thickness, while an arrow indicates the perpendicular measurement direction.
- Final Setup: Place the guide card on the vessel’s exterior at the correct angle, then adjust the laser so its beam targets the marked star on the card. This setup positions the cutting tip inside the vessel, with the laser indicating the external boundary of the desired thickness.
Now, with the laser correctly aligned, you’re set to begin hollowing with precision, ensuring your work’s thickness is exactly as intended.

For accurate measurements with the laser system, follow these streamlined steps:
- Perpendicular Measurements: Ensure the laser is always perpendicular to the vessel’s side for precise readings.
- Adjusting the Laser: The laser’s position relative to the cutting edge must remain perpendicular. Adjust the laser as needed to match the vessel’s shape. See Illustration 3 above to see an example of the positions to put the laser in to measure accurately.
- Quick Setup: Using a card as a guide, setting the laser takes just seconds. Hold the bracket with one hand and the guide card with the other to align the laser quickly.
- Efficiency and Enjoyment: This method not only speeds up the measuring process, making it more accurate and enjoyable, but it also potentially doubles the efficiency of creating hollow forms. This could mean more productivity and, possibly, more profit and fun for those selling their work.

Explore broader applications of the laser for enhancing woodturning projects:
-
Mastering the Vessel’s Bottom: Adjust the laser to a zero gap for precise bottom finishing, eliminating guesswork. Position the cutting tip at the vessel’s bottom center and use the laser to mark the exact depth on the waste block’s exterior. This method accurately defines the bottom without risking damage.
-
Versatile Bottom Contours: With the laser set to zero gap, observe how the light tracks cutting inside the waste block. This visual guide assists in sculpting the bottom of the vessel to any desired shape—flat, coned, or rounded—ensuring perfect results every time. It’s important to avoid cutting into the wall thickness already measured.
-
Universal Compatibility: The laser system is designed to adapt to any boring bar setup, ensuring it’s a valuable tool for woodturners seeking precision and ease of use.
This innovative approach simplifies the process and opens up new creative possibilities, making complex bottom shapes easy to achieve with confidence.
Carbide Cutter Assembly

The Jamieson/Hunter Carbide Cutter offers two significant benefits for woodturners:
-
Maintenance-Free Durability: Forget about sharpening; simply rotate the cutter to a new edge until it’s time for a replacement. This cutter’s lifespan outperforms traditional HSS tools by 25 to 100 times, eliminating the need for grinding or sharpening.
-
Superior Cutting Quality: Enjoy cleaner, slicing cuts that leave behind a smoother surface than standard scrapers. This means less sanding and reduced tear-out on end grains, enhancing the finish of your work.
The Jamieson/Hunter Carbide Cutter, designed for use with the Jamieson Hollowing System, marries convenience with performance.
Included in the Carbide Cutter Assembly:
- A 3/16 inch machined shaft
- High-tech nanograin Jamieson/Hunter Carbide Cutter
- Torex screw and wrench
- Protective cap
Installation is straightforward: replace the 3/16 inch HSS scraper cutter with the Carbide Cutter Assembly in your swivel tip assembly. For optimal performance, angle the cutter to the left within the swivel holder. Unlike the scraper cutter, this orientation ensures a slicing motion that’s ideal for undercutting or reaching behind vessel shoulders, producing shavings instead of dust. Test it on the toughest woods to see the difference firsthand.
Jamieson/Hunter Carbide Cutter Assembly – actual size of cutter shaft is 1 ¼ inches – size of carbide cutter is 3/16 inch or Hunter #1.
Includes:
- 3/16 inch X 1 ¼ long shaft
- Torx screw and Torx wrench
- Hunter #1 Nanograin Carbide Cutter
- Clean out pin
- Protective cover
DVD In-Depth Hollowing Techniques-The Easy Way >> DOWNLOAD
The set up and use techniques are in my DVD, In-Depth Hollowing and it gives much more detailed help for both woodturning tool boring bar system and laser measuring. It is 90 minutes long, produced and edited by Phil Pratt.
DVD Bowl Basic >> DOWNLOAD
Disc 1
1 Beginning
2 Introduction
3 Basic Elements
4 The Lathe
5 Boots
6 Glove
7 Control
8 Start Between Centers
9 Bandsaw… yes or no?
10 Lathe Foot Adjustment
11 Faceshield
12 Initial Lathe Speed
13 Just Four Basic Cuts
14 Grain Orientation
15 Push Cut Introduction
16 Lathe Forces
17 Moving the Axis
18 Sharpening
19 Dressing the Wheel
20 Jamieson Grind
21 Balance Grain Orientation
22 Chainsawing
23 Define Pushing Cut
24 Cut Supported Fibers
25 The Pencil Trick
26 Transfer of Power
27 Chuck Limitations
28 Prepare Concave Surface
29 Scraping Cut Defined
30 Glue Block
31 Understanding CA Glue
32 Glue-up Process
33 Design Considerations
34 Pull Cut Defined
35 Tool Rests
Disc 2
1 Beginning
2 Clean Up Face
3 Shaping Back of Bowl
4 Sheer Scrape
5 Getting a Smooth Curve
6 Stay Sharp
7 Tailstock… or not?
8 Shortbed or Longbed
9 Push Cut Inside Bowl
10 Jamieson Grind Defined
11 Push Cut Bevel Support
12 Perpendicularity
13 Wall Thickness
14 Cut in Stages
15 Get a Clean Final Cut
16 Transition of Stages
17 Immeasurable Bottom
18 Continuous Curve
19 Sanding Considerations
20 Reversing the Bowl
21 Shaping the Foot
22 Finishes
23 Wood Movement
24 Other Drying Methods
25 In Review
26 Ending