


Description
Woodturner’s Basic Package
Woodturning tools often present ergonomic challenges, particularly when hollowing vessels. Traditional methods require bending over the lathe, leading to back and neck strain. The Jamieson Hollow Form Turning System was developed in response to these challenges, offering a safer and more enjoyable hollowing experience.
The Jamieson Hollow Form Turning System
This innovative system introduces a secondary backrest behind the main tool rest, simplifying the hollowing process. It allows turners to guide the cutter into the vessel with ease, eliminating the physical strain and fear of catches. This approach is not only about comfort but also ensures total control, significantly improving safety.
CLICK HERE FOR INSTALLATION INSTRUCTIONS
There is more information on the topics listed below:
- One Boring Bar with 3 Reach Cutting Capabilities
- 3/4 inch Dual Purpose Boring Bar
- Swivel Assemblies
- Backrest designed to fit any lathe
- Laser Measuring System
- In-Depth Hollowing Techniques-The Easy Way DOWNLOAD
Woodturning Tools in the Basic Package
One Boring Bar with 3 Reach Capabilities
The ¾ inch diameter, 17 inch long dual purpose boring bar has the following options to allow access to any shape hollow form turning.

Top bar with a straight swivel assembly.
Middle bar with a bent swivel assembly.
Bottom bar with a straight swivel assembly in the opposite end, featuring a 45-degree angled hole.
¾ Inch Dual Purpose Boring Bar
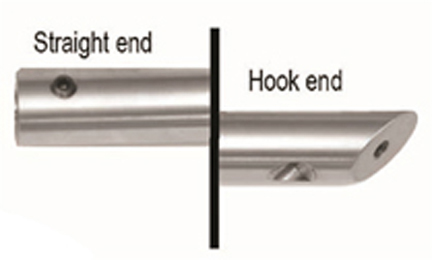 The boring bar has is a dual function. It has a hole in both ends for the swivel tip cutter assembly.
This gives you a straight boring bar on one end and a bent type boring bar on the other end. Just flip the bar end to end.
Swivel Assemblies

The package includes two swivel assemblies – one straight and one bent. The bent assembly is often used in the standard 3/4 inch boring bar. The bent swivel allows greater access inside the shoulder area of a hollow form. The bent swivel is capable of reaching inside of most traditional bulbous shapes through small openings.
“D” Stabilizing Handle
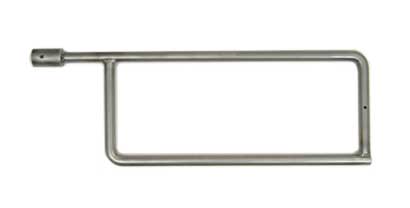
Lyle uses a “D” shaped handle in his woodturning tools for a very practical reason: it effectively distributes the twisting forces that occur during hollowing. This design is especially useful when the cutter needs to reach difficult spots or undercut areas, where twisting forces can be intense. The “D” shaped handle, coupled with Lyle’s backrest design, significantly reduces stress and strain.
The beauty of this system is its simplicity and ease of use. It allows you to stand upright in a comfortable position in front of the lathe, giving you precise control over the tool with just your fingertips. This means you can focus on the finer details of your work, like smoothing out tool marks and perfecting the inside contours of your vessel, without the discomfort of leaning over or gripping the tool too tightly.
This ergonomic approach addresses a common challenge in woodturning: the physical strain of hollowing out a vessel. Traditional methods often lead to back and neck pain. Lyle’s system changes this, making woodturning tools more enjoyable and the process less physically taxing. You can now hollow forms comfortably, without the hard work and strain that used to be part of the process.
Backrest
 The system includes a backrest that supports and stabilizes the handle, effectively removing torquing or twisting forces common in handheld boring bars. This backrest is adaptable to lathes of all sizes, from mini to full-size.
Laser Measuring System

An integral part of this package is the laser measuring system, which allows for accurate and easy measurement of hollow form wall thickness. This system is versatile and can be used for a range of projects, from tiny ornaments to large vessels.

Using the Laser System Made Easy
The laser system is straightforward to use. You adjust the laser so that its beam is at the exact distance from the cutting tip that you want your wall’s thickness to be. This distance, or “gap,” between the laser light and the cutter determines the thickness of your vessel’s wall (See Illustration 1).
As you hollow out the form, the laser beam stays on top, guiding your cutting. When the beam moves to the vessel’s side, it’s time to slow down your work. Once the laser beam moves off the vessel and shines on the floor, it signals that you’ve reached the desired wall thickness. At this point, stop cutting and just do a light pass to clean up any remaining tool marks, without thinning the wall further.
To set the laser, lock down all supporting hardware so that all you have to move for an adjustment is the bracket holding the laser. Now all future adjustments can be made easily by moving or swiveling the laser holding bracket at the end of the tubing that supports it.

Simple Steps to Measure with the Laser System
To accurately measure with the laser, start by setting your boring bar at the right angle to enter the vessel and position the cutting tip for cutting. Remember this angle; it’s crucial for accurate measurement.
-
Position the Boring Bar: After setting the angle, remove the boring bar from the vessel and place it on both the front and back stabilizing tool rests at the same cutting angle.
-
Ensure Accurate Measurement: If the boring bar’s angle changes during cutting, it could lead to incorrect measurements. Keep the angle consistent for precision.
-
Set the Laser Correctly: The laser must be positioned to measure at a 90-degree angle through the vessel’s wall. This ensures that your measurements are perpendicular and accurate.
-
Use a Guide for Precision: A simple plastic card with lines can guide you in setting the laser. The line near the edge of the card represents your desired wall thickness, and an arrow line shows the perpendicular direction for measurement. Position the card outside the hollow form at the angle needed for perpendicular measurement. Then, move the card next to the cutting tip, maintaining the angle.
-
Adjust the Laser: Aim the laser so its light hits the star mark on your guide card. This setup ensures that the laser is correctly aligned with the cutting tip inside the vessel, allowing for precise hollowing.

Easy and Efficient Laser Measurement Method
Using the laser for measurement is straightforward and efficient:
-
Perpendicular Alignment: It’s important to keep the laser aligned perpendicular to the vessel’s side. This ensures accurate measurements.
-
Adjust According to Vessel Shape: The laser’s position may need to be adjusted periodically to match the changing contours of your woodturning project. This helps maintain accuracy as the vessel’s shape evolves. See Illustration 3 above to see an example of the positions I would put the laser in to measure accurately.
-
Quick Setup with a Guide Card: Setting up the laser is quick and easy – it just takes a few seconds. Hold the guide card with one hand and adjust the laser bracket with the other. This method is not only faster but also more accurate and enjoyable.
-
Enhanced Speed and Fun: With this laser system, measuring becomes not only more accurate but also quicker and more enjoyable. It could even make your woodturning process more efficient, potentially doubling the fun and productivity!

More Exciting Uses for the Laser System
-
Measuring the Bottom of the Vessel: You can adjust the laser for measuring the bottom of your woodturning project. Set the laser so there’s no gap between it and the cutting tip. This allows you to precisely determine the depth of the vessel’s bottom. Simply mark the outside of the waste block where the laser hits, and you’ve accurately found the bottom. This method eliminates guesswork in measuring the depth.
-
Creating Perfect Bottom Contours: With the laser still set to zero gap, you can shape the bottom of your vessel with precision (See spots on Illustration 4). As you cut, the laser light moves along the waste wood, showing you the exact shape you’re creating – whether it’s flat, coned, or rounded. Just remember to avoid cutting into the side walls, as the laser is set only to measure the bottom depth at this stage.
-
Versatile and Adaptable: This laser system is designed to fit any boring bar unit, making it a versatile tool for a range of woodturning projects.
Woodturning Tools Learning Resources
In-Depth Hollowing Techniques- The Easy Way DOWNLOAD
To ensure users get the most out of these woodturning tools and system, Lyle offers a detailed instructional DVD. This 90-minute guide, produced by Phil Pratt, covers both the boring bar system and the laser measuring techniques, making hollow form turning more accessible and fun for everyone.